
ELK stack is a powerful open-source tool that is widely used for analyzing and visualizing logs and other data. The stack consists of Elasticsearch, Logstash, and Kibana. Elasticsearch is a search and analytics engine for analyzing logs. Logstash is a data processing pipeline for collecting and transforming logs. Kibana is a visualization platform that provides a web dashboard where you can visualize data from Elasticsearch.
This article will guide you through the process of installing and configuring the ELK stack on Rocky Linux.
Prerequisites
Before we start, make sure you have the following:
- Two Rocky Linux servers with sudo privileges
- Java Development Kit installed
You can run this command to check if Java is already installed on your system.
$ java -version
If it is not installed, you can use this command to install OpenJDK 17.
$ sudo dnf install java-17-openjdk java-17-openjdk-devel
For more detailed information on how to install Java on Rocky Linux, you can read this article.
Install Elasticsearch 8 on Rocky Linux
First, we will install Elasticsearch on the system. To do so, you have to set up the Elasticsearch repository as the Elasticsearch package is not included in the default repositories of Rocky Linux.
Run the following command to import the GPG key for Elastic search.
$ sudo rpm --import https://artifacts.elastic.co/GPG-KEY-elasticsearch
To add the Elasticsearch repository, create a new file elasticsearch.repo in the directory /etc/yum.repos.d/.
$ sudo nano /etc/yum.repos.d/elasticsearch.repo
Then paste the below content into it.
[elasticsearch]
name=Elasticsearch repository for 8.x packages
baseurl=https://artifacts.elastic.co/packages/8.x/yum
gpgcheck=1
gpgkey=https://artifacts.elastic.co/GPG-KEY-elasticsearch
enabled=1
autorefresh=1
type=rpm-md
Press Ctrl+X to exit and enter y to save changes.
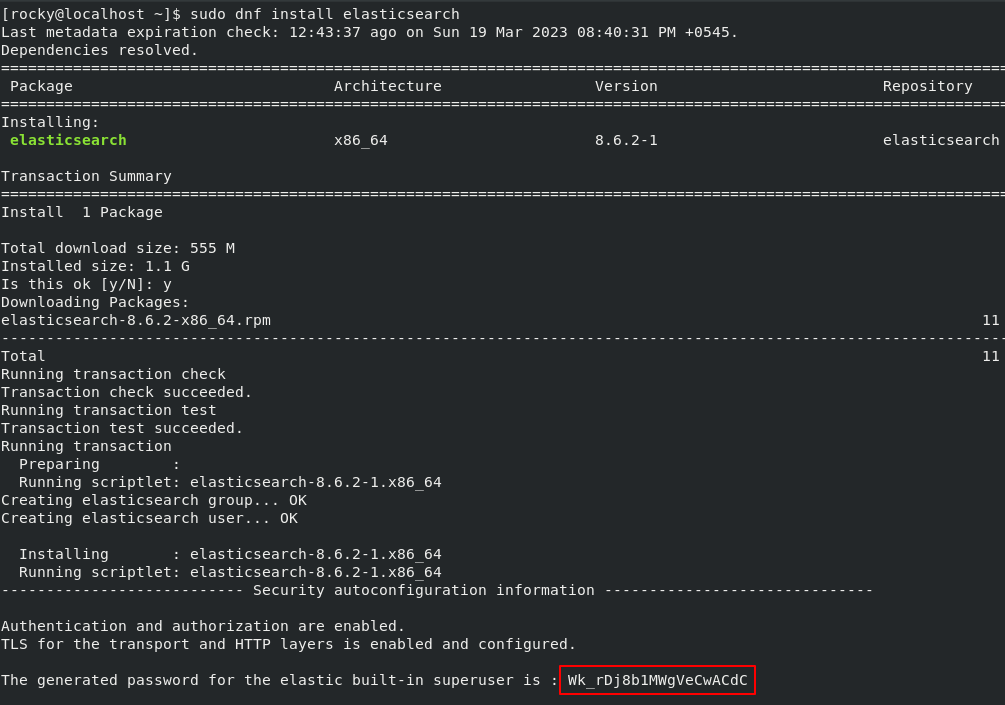
Now the repository is ready to use. Run this command to begin the installation of Elasticsearch.
$ sudo dnf install elasticsearch
Configure Elasticsearch 8 on Rocky Linux
Once you finish the installation, you will need to edit the configuration file elasticsearch.yml in the /etc/elasticsearch directory.
Run the below command to open the configuration file in the nano editor.
$ sudo nano /etc/elasticsearch/elasticsearch.yml
Provide the name for the node, cluster, data path, and network host like the following.
cluster.name: MyCluster
     node.name: mynode
     path.data: /var/lib/elasticsearch
     network.host: 0.0.0.0
# Single Node Discovery
discovery.type: single-node
Now, save and close the editor using Ctrl+X and y buttons.
Start the elasticsearch service with the following command.
$ sudo systemctl start elasticsearch
Run this command to enable elasticsearch to start at system boot.
$ sudo systemctl enable elasticsearch
You can use this command to verify the status of the service.
$ sudo systemctl status elasticsearch
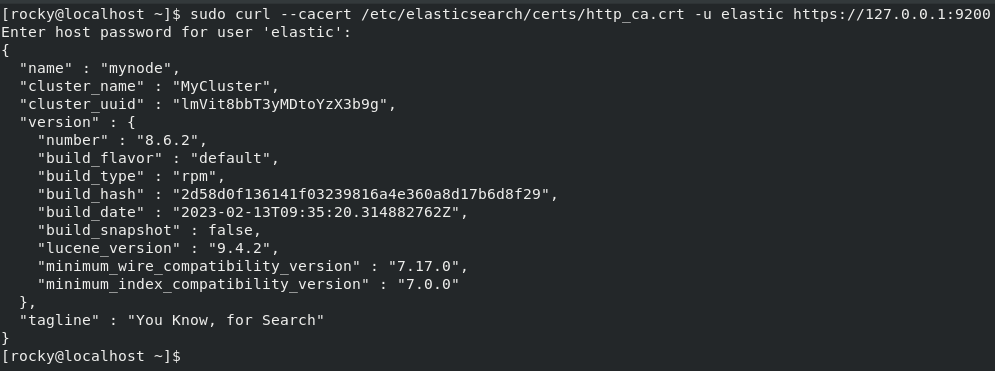
To verify whether elasticsearch is successfully configured, execute the command below.
curl -X GET 'http://127.0.0.1:9200'
Install and Configure Logstash on Rocky Linux
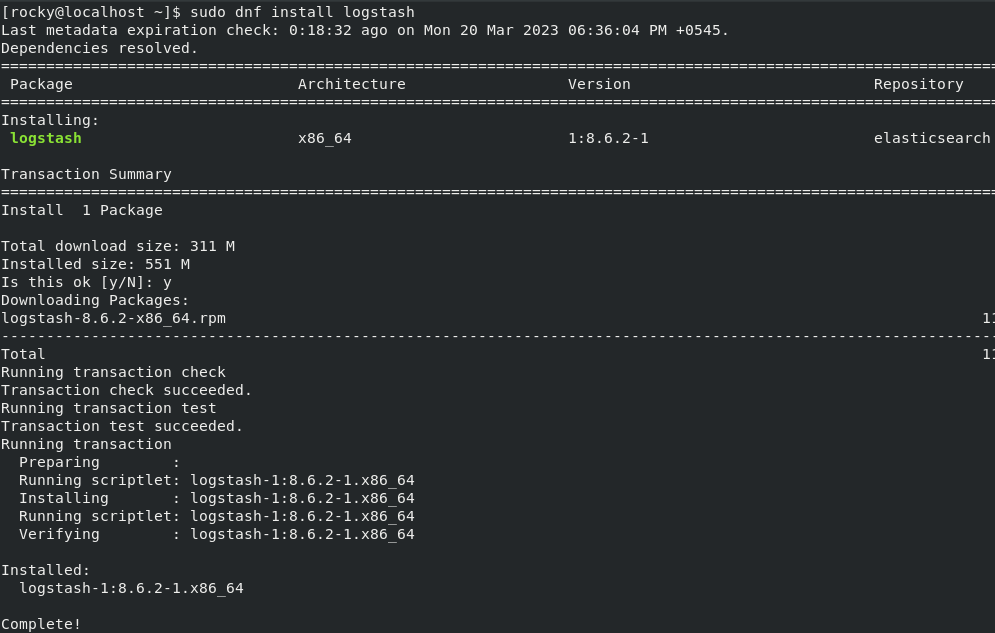
You can run this command to install Logstash on your system.
$ sudo dnf install logstash
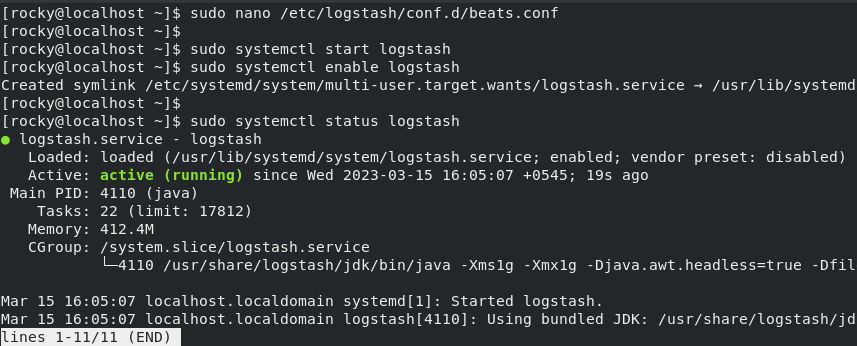
Once the installation is complete, edit the configuration file for Logstash.
$ sudo nano /etc/logstash/conf.d/beats.conf
Add the following lines to the file.
input {
  beats {
    port => 5044
}
}

filter {
if [type] == "syslog" {
grok {
match => { "message" => "%{SYSLOGLINE}" }
}
date {
match => [ "timestamp", "MMM d HH:mm:ss", "MMM dd HH:mm:ss" ]
}
}
}

output {
elasticsearch {
hosts => ["192.168.18.76:9200"] # use your own host ip address here
index => "%{[@metadata][beat]}-%{+YYYY.MM.dd}"
}
}
Now, start and enable the Logstash service using the following command.
$ sudo systemctl start logstash
$ sudo systemctl enable logstash
Verify the status of the Logstash service.
$ sudo systemctl status logstash
 Run this command to check if Logstash is listening on port 5044.
$ sudo netstat -plntu | grep 5044

Install and Configure Kibana on Rocky Linux
To install Kibana on Rocky Linux, run the following command.
$ sudo dnf install kibana

To configure Kibana, run this command.
$ sudo nano /etc/kibana/kibana.yml
Modify the following lines with your own hostname.
server.host: "0.0.0.0"
server.name: "rockylinux"
elasticsearch.hosts: ["http://192.168.18.76:9200"]
Now, start and enable the Kibana service using the following commands.
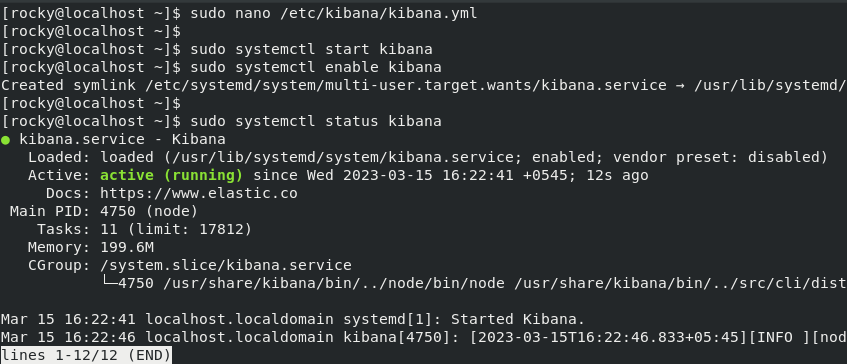
$ sudo systemctl start kibana
$ sudo systemctl enable kibana
Verify the status of the Kibana service.
$ sudo systemctl status kibana
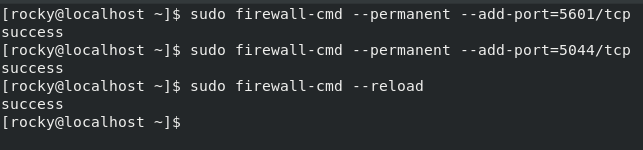
Allow Kibana ports through the firewall.
$ sudo firewall-cmd --permanent --add-port=5601/tcp
$ sudo firewall-cmd --permanent --add-port=5044/tcp
$ sudo firewall-cmd --reload
Install and Configure Filebeat on Rocky Linux
In this tutorial, we will use Filebeat to ship logs to Logstash on the elastic server. To install Filebeat on the client machine, you must first import the GPG key and add the repository.
$ sudo rpm --import https://artifacts.elastic.co/GPG-KEY-elasticsearch
Create a new file elasticsearch.repo in the directory /etc/yum.repos.d/.
$ sudo nano /etc/yum.repos.d/elasticsearch.repo
Then add the following content to it.
[elasticsearch]
name=Elasticsearch repository for 8.x packages
baseurl=https://artifacts.elastic.co/packages/8.x/yum
gpgcheck=1
gpgkey=https://artifacts.elastic.co/GPG-KEY-elasticsearch
enabled=1
autorefresh=1
type=rpm-md
Press Ctrl+X to exit and enter y to save changes.
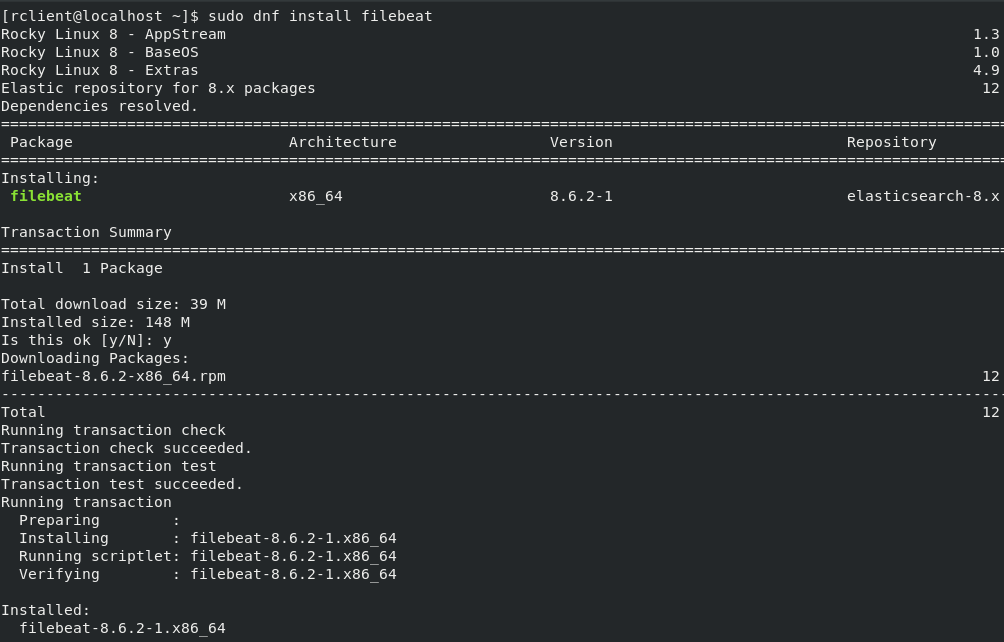
Now, run this command to install Filbeat on your system.
$ sudo dnf install filebeat
Execute this command to configure Filebeat.
$ sudo nano /etc/filebeat/filebeat.yml
In the configuration file, disable the default elasticsearch output by commenting on these lines.
#output.elasticsearch:
  # Array of hosts to connect to.
  #  hosts: ["localhost"]
Next, find the below lines and enable the logstash output as shown below.
output.logstash:
  # The Logstash hosts
  hosts: ["192.168.18.76:5044"]
Then change the following values in the file.
- type: log
# Change to true to enable this input configuration.
enabled: true
# Paths that should be crawled  paths:
- /var/log/messages
Press Ctrl+x to exit the editor and enter y to save changes.
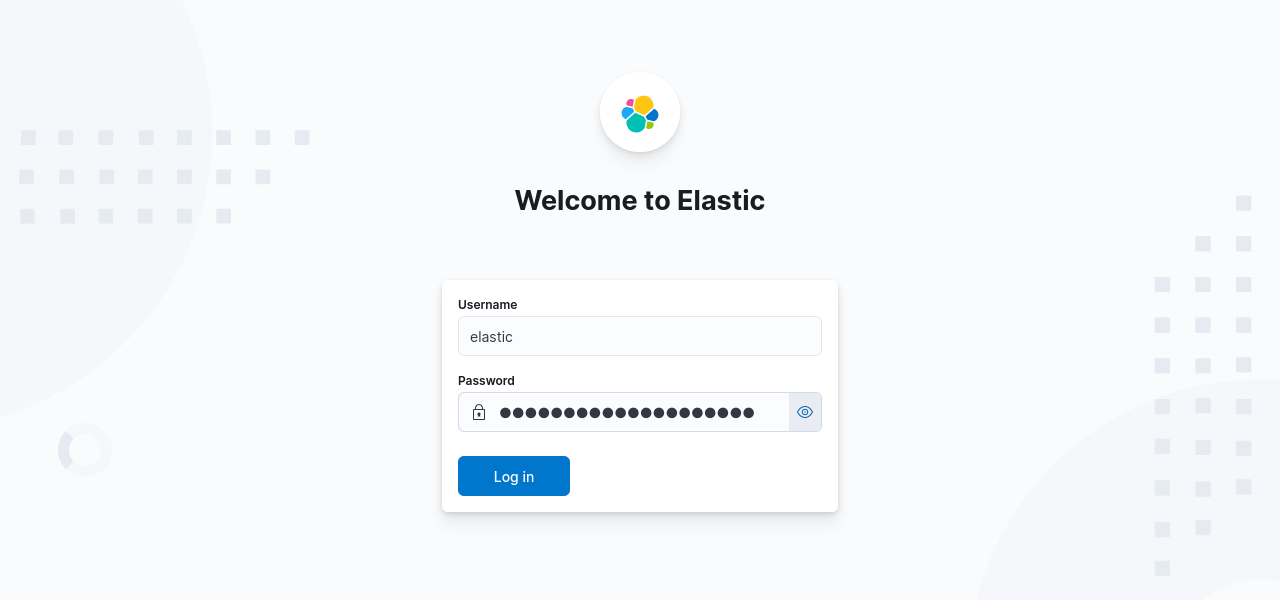
Access Kibana Web Interface
You can visit the Kibana web dashboard using the URL: https://ip_address:5601/
You will see the following web page.
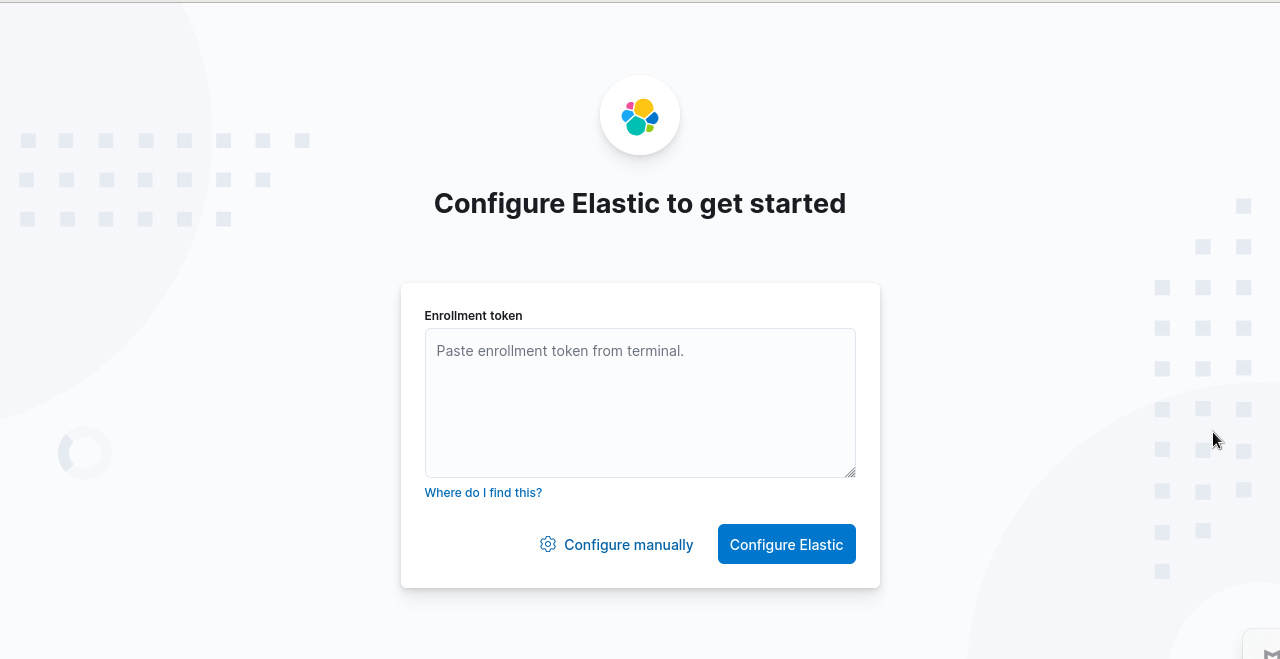
You will need to generate the enrollment token to configure Elastic. Go to /usr/share/elasticsearch/bin directory and run the following command.
$ sudo ./elasticsearch-create-enrollment-token --scope kibana

Paste the generated enrollment token and click Configure Elastic. Then you will need to provide the verification code from the Kibana server.
Run the following command in the terminal to get Kibana’s verification code.
$ cd /usr/share/kibana/bin
$ sudo ./kibana-verification-code

Paste the code and click the Verify button.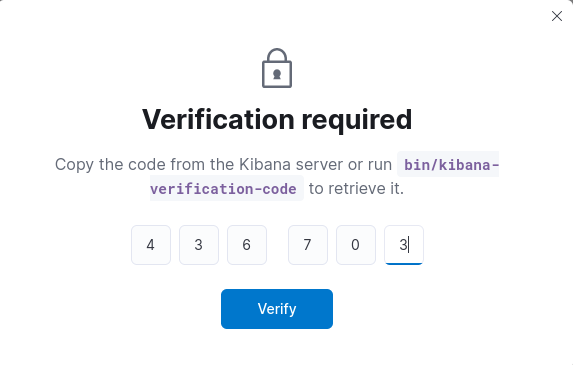
Now, enter the default username and password to log in to Elastic.
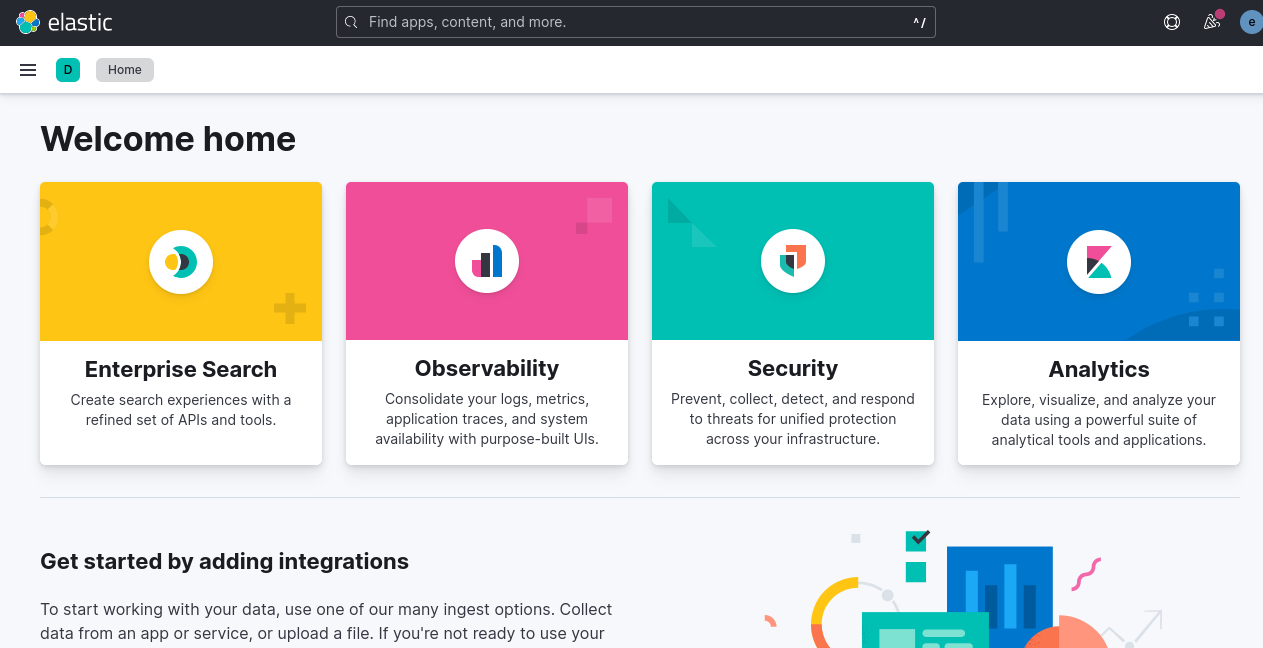
The home page should be similar to the image below.
Conclusion
Now you know how to install and configure the ELK stack on Rocky Linux. You have learned to apply the necessary configuration settings for using Elastic Stack on Rocky Linux. We hope you find this tutorial helpful.
If you having trouble configuring the ELK stack, please let us know in the comment section.