Linux is a multi-user and multi-tasking operating system. User and group management are the two most important tasks to be performed by Linux administrators.
In Linux, each user has their own login name and a home directory. Every user belongs to a primary group, and users can be added to multiple secondary groups. All users in the group will have the same group permission on files and folders. This makes it easier to provide permission for multiple users.
This tutorial will demonstrate how to manage users and groups in the Linux system.
A Quick Overview
The command-line tools to manage the users and groups in Linux are:
adduser / useradd: To add a user
addgroup / groupadd: To add a group
usermod: To modify a user account
deluser / userdel: To delete a user
delgroup / groupdel: To delete a group
passwd: To change the user’s password
We will cover the practical examples of all commands in this article. To follow the tutorial, you will need to switch to the root user or any user with sudo privileges.
1. Create a new user
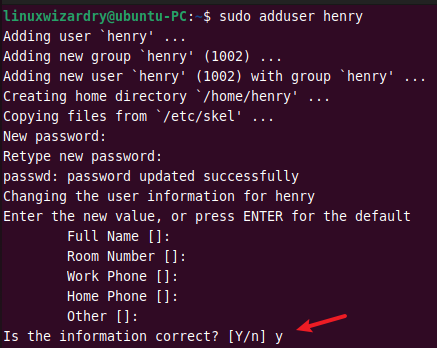
You can add a new user to the system using the adduser command. The following command creates a new user henry in the system.
$ sudo adduser henry
It will prompt you to enter the password for the new user and other user details.
Output:

To verify the user, you can try to log in as a new user.
su - henry
Output:

2. Understanding the /etc/passwd file
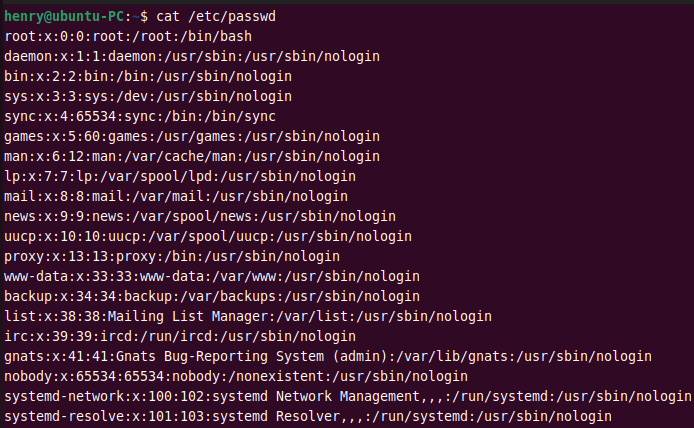
The /etc/passwd is a plain text file that stores the user account information in Linux. You can use the cat command to view the content of /etc/passwd.
$ cat /etc/passwd
Output:

Each user has one entry per line. The fields are separated by a colon : symbol and contains the following information.
username:password:UID:GID:GECOS:home_directory:shell
The new entries are saved at the end of a file. To find a user henry, you can see the last entries. Alternatively, you can use the grep command.
$ grep henry /etc/passwd
Output:

3. Change the login name of a user
You can use the usermod command to change a user’s login name in Linux. This command renames the user henry to james.
$ sudo usermod -l james henry
Output:

As you can see, the username is changed to james.
4. Change the user ID of a user
By default, the system automatically sets the next available UID when creating a user. The usermod command with -u flag can be used to change the UID of a user.
The following command changes the user ID of james to 4567.
$ sudo usermod -u 4567 james
Output:

5. Change the group of a user
The -g option with usermod command changes the primary group of a user. For example, to change the primary group of a user james to linuxwizardry, you can run this command.
$ sudo usermod -g linuxwizardry james
The specified group must already exist in the system.
Output:

In Linux, a user can have only one primary group. But you can assign a user to multiple secondary groups. The -G flag allows you to specify the secondary group for a user.
The following command adds a user james to the group ubuntu.
$ sudo usermod -G ubuntu james
Output:

6. Add a user to the sudoers group
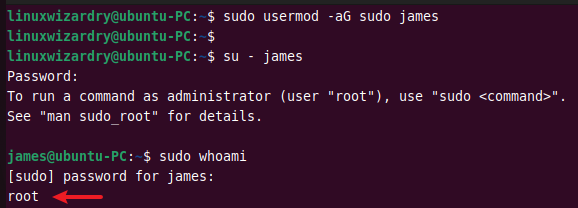
You can add a user to the sudoers group and provide sudo privileges to that user. This command adds a user james to the sudo group.
$ sudo usermod -aG sudo james
The -a option adds a user to the group without removing the current group.
Next, log in as a user james and run the sudo command to confirm.
$ su - james
$ sudo whoami
Output:

7. Change the password of a user
The passwd command is used to change the user’s password in Linux. The following command changes the password of a user james.
$ sudo passwd james
Output:

8. Delete a user
When the user account is not needed, you might want to delete it from the system. The userdel command helps to remove a user in Linux.
The below command deletes a user james from the system.
$ sudo userdel james
Output:

9. Delete a home directory of a user
The usedel command without any flags only removes a user. It does not delete the home directory of a user in the /home directory.
To delete a user along with its home directory, you can use:
$ sudo userdel -r james
10. Add a new group
You can add a new group to the system using the groupadd or addgroup command. The following example creates a new group computer on the system.
$ sudo groupadd computer
OR
$ sudo addgroup computer
Output:

11. Understanding /etc/group file
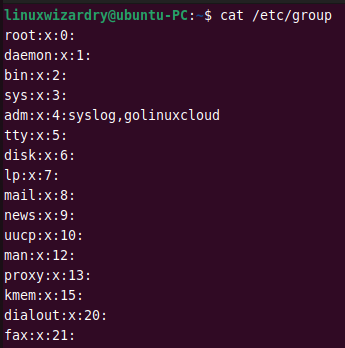
The /etc/group file stores the group details in a list. Each entry contains the following group information for each group.
group_name:group_pwd:group_id:group_list
You can display the entries in /etc/group file with the cat command.
$ cat /etc/group
Output:

12. Create a system group
If you need to add a new system group, you can use the -r flag with the groupadd command. This command creates a new system group sysmin.
$ sudo groupadd -r sysmin
Output:

13. Add a new group with specific GID
When creating a new group, the system assigns the next available group ID by default. You can change this behavior and specify a GID for a new group with the -g flag.
The following command creates a new group bank with a custom group ID 644.
Output:

14. Remove a user from the group
Sometimes you might need to remove a user from the secondary groups. You can do it by specifying the username and group to the deluser command.
The below command removes a user rohan from the group ubuntu.
$ sudo deluser rohan ubuntu
Output:

15. Delete a group
You can remove a group from the system using the delgroup or groupdel command.
To delete a group ubuntu, run the following command.
$ sudo delgroup ubuntu
Output:

If the specified group is the primary group of any user, it cannot be deleted. You must first change the primary group of a user.
Conclusion
Managing users and groups is one of the essential skills for every Linux administrator. You have learned the different examples of user and group management commands in Linux. Now you know how to perform the tasks like creating new users and groups, adding users to groups, changing the username and password, deleting users and groups, and much more.
We hope you found this article helpful. Please let us know if you have any confusion about any examples in the comment section below.


Discussion about this post